Showing posts with label DIY. Show all posts

Saturday, May 29, 2010

Dryer balls...

So, in our journey to cloth diapering I've learned that you shouldn't use fabric softeners and/or dryer sheets because it can stop your diapers (and your dish towels for that matter) from absorbing. So I was on the hunt for another way to keep my diapers nice and soft while not affecting their absorption.

Enter the dryer ball.  There were two options for dryer balls - the plastic PVC ones with nubbies all over them or all natural wool dryer balls.  Since the plastic ones can give off chemicals when heated I opted for the all natural version.  I searched around the web and found lots of options on etsy.com.  However, they were expensive - about $20 for three balls and you'd need 4-6 for a normal sized load of laundry I read.  Being the crafty (or wanna be crafty) gal that I am, I asked Mr. Google how to make my own wool dryer balls and voila - the Goodmama had a spectacular tutorial to guide me along!

I followed her instructions pretty closely and am very happy with the results.  You can see in the pictures below the balls ready for their first felting.  I actually ran them thru two hot washes and then dried them.  That got them felted up nice and tight.


The image below is the after the final felting before I started using them.  They're about the size of a softball, maybe a tad smaller.

I've been using them for a week now and have noticed a difference in my drying times.  Plus, my clothes are as just as soft and static free as if I was using dryer sheets.  With smaller loads you do notice the bumping of the balls as they tumble in the dryer but I just close the door to the laundry room and forget about it.

I used 100% wool yarn I found at Michaels (Lion brand) and one skein was $8.  I made 2 balls from one skein and still have a bunch left over (so much that I think I might get another ball or two out of it).  So, for $8 and a few hours of work I have 4 dryer balls (I of course wanted different colors so in reality I spent $24 on yarn - but I have enough to make many more balls or even a woolie soaker once I figure out how to knit!) 

So there you have it!  It's a definite worth while DIY project! Especially if you're a knitter already and have scraps avail!  Then you really get to use everything up and get your money's worth!

(i must mention of course the best way to dry your cloth diapers is on the line outside but as a working mom that's just not practical for us except for the weekends)

Sunday, May 16, 2010

Crafty crafty...

I've seen these marble magnets on a variety of different blogs and thought, "hey, I can do that"...and I did! So happy with how they turned out! I need bigger magnets for the larger ones but the tiny ones work perfectly!

I've been trying out new crafty items to see what works, is easy and cost efficient in preparation for a big fundraiser later in the fall for Nothing but Nets (blog to come on that).

I found directions over at Not Martha - super easy project with super cute results....


Tuesday, February 9, 2010

Picture Update...

So I've been talking about progress so I thought I'd play show and tell to keep you guys updated!

First pic is of the kitchen as it stands today...sans outlet covers and paint but with pretty much everything else.  I can even claim to have helped with the grouting!!!  Wooohoo...

The some nursery pics...still not done but my bro will be out in the next few weeks to finish the mural - I can't wait!! He's so talented and little man is going to be a lucky boy to have that on his walls!

 
Notice the awesome glider in the right corner - scored that at BRU today, brought it home and assembled it myself!  Soo proud!  I also started washing little mans clothes in preparation for this arrival!  I can't believe it's getting close.
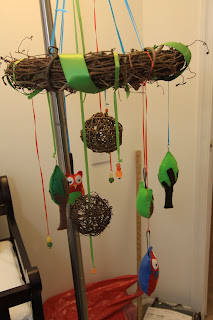
The last set of pics are of the mobile I made for little man.  Now keep in mind, this is for the corner of his room - not over his crib!  I realize that many of the parts are not child friendly!  As he gets older and grabby we can alter the mobile and leave just the plush owls!!  Anywho, this was a ton of fun to put togeher and I have to get a better pic once the sun comes up!


Monday, January 18, 2010

DIY Binky Holder...

I've been looking in Target and other stores for binky leashes (you know, the ribbons that at one end attach to the binky and the other side attaches to your child's clothing so you don't lose the binky when they decide to spit it out?) and haven't found one I like:(  Anyways, I ran across a tutorial online at The Mama Dramalogues on how to make one of your very own - without sewing!

I thought I'd give it a shot.  I ordered copious amts of ribbon from theribbonspot.com, plastic clips and mam rubber binky holders from a seller on ebay, and snaps from JoAnn.  Everything finally arrived yesterday so I spent most of my day today putting them together (during conference calls of course!).


Lessons Learned:
1. hammer + fingernail = pain (see my other blog post)
2. snaps aren't all the hard to attach if you follow the directions - which I didn't so I wasted lots!
3.  it's infinitely more expensive to do this if you don't already have the parts on hand from other crafts ($40 in ribbon, $20 in ebay items, $10 in snaps etc..).  I managed to get 5 leashes out of it so far (but I have plenty more I can make but really - how many leashes does a child need?)

However, I have lots of ribbon for other projects and really like the ones I put together.  Maybe other mammas will see them and want one and I can open my own etsy store...ha ha..ya, right - wishful thinking:) I'm really not all that crafty!

Craft FAIL..

I have another post with the product of this craft FAIL but thought I should highlight my gafe because you all can have a good laugh at my expense:)

Note to self and others...hammer plus finger nail = pain.  My poor finger...I was hammering the snaps on to the binky clips and missed!


Wednesday, January 13, 2010

Feeling Crafty...

I'm guessing this is the start of nesting or maybe just my version of nesting but all I want to do right now is make things for our little man - crafty things!  I saw a mobile the other day that had birds on it and I thought, how wonderful would that be if I could make that with woodland creatures instead!  Then that had me on the hunt for a good felt pattern for owls, foxes, hedgies, and other cute creatures.  Well, I've only found an owl so far but I thought that'd be a good start.  Let's see if I can do this....:)

Here's the inspiration:

These cuties and their pattern came from Juicy Bits Blog and they looked simple enough to make....although, I'm not much of a sewer and this carpal tunnel has me a bit limited.

Here's my rendition:

Because this is going in the baby's room (and the fact that I couldn't find safety eyes at JoAnn or Michaels) their eyes are just sewn in rather than cute little buttons.  The blue guy is my second try and I'm definitely getting better and cleaner as I go!  I used Google to figure out the blanket stitch that you see around the outside (to fuse the two halves together) and sat and made them while DH tried to refinance the house:)

Pretty good for a first pass.  Now off to cut out 4 more or so and maybe a few small ones too. 

Next up, learning to crochet an amiguri doll!!

Monday, January 11, 2010

Mobile Crazy...

So I was going back and forth with a fellow blogger over at Baby Booties  about nursery deco and she's looking for a good mobile that's not too girlie or cheap looking.  Knowing that I've seen a number of them in my travels on the internet I set out looking again for answers for her and just happened to find something I think I might do for little man's room (since the mobile that goes with his bedding is like $60!).

There are tons of cute ones out there for sure but finding one that doesn't cost an arm and a leg but that doesn't look cheap is harder so...I think I might DIY one!  Here's some inspiration:

The Butterfly Mobile at Indie Fixx:

But I'd do woodland creatures rather than butterflies....

The Bird Mobile over at Spool Sewing:


This one I love love love but I'm so not a sewer that's for sure and I dont know how I'd do woodland creatures on this (or maybe I'd just leave it as birds but again, so not a sewer!)

The Pinwheel Mobile over at Chickpea Sewing Studio


This is actually a pretty neat idea! It's kinda theme neutral and you can use scraps of fabric (or even heavy paper is you're really crafty).  You can make it to match any color scheme!

Anyways...now I'm inspired and am heading out to find good patterns for woodland creatures to go with my idea....i'll post progress/results as I make them!

Sunday, January 10, 2010

Organized....

Quite a productive weekend this time round.  I met up with the M54 girls for lunch (all of them are due right around when I am so we were trading pregnancy war stories:) ), I finally got the closet system up in Bigfoot's closet, DH got the window casing in in the kitchen and we got the tile backsplash ordered for the kitchen!  Not to mention I spent way too much time at Target again and added JoAnn Fabrics to the mix just for fun!

Here are pics of his closet:

Before:


After:


And his new toy cubby in the corner....soon to be relocated when we rearrange the room.


Thursday, January 7, 2010

Artwork...

So, I can't help myself when I walk into Target. My list may only have 1 or 2 things on it and I inevitably walk out with a cart full of things. This time I did have intentions of finding art for the baby's room I just wasnt sure what I was looking for.

I walked up and down the aisles trying to imagine the things on the shelves as wall art. After putting way too many things in my cart as always I found what I needed - in the scrapbook aisle! I found a pack of paper that had an outdoors/woodland creatures theme and had some great bright colors! Off I wandered to the frame aisle to find plain black frames to use to put my new "art" in.

Below is the outcome - I can't wait to hang them on the walls!

Posted by Picasa

LinkWithin

Related Posts with Thumbnails